原型模式
原型模式(Prototype Pattern)是用于创建重复的对象,同时又能保证性能。这种类型的设计模式属于创建型模式,它提供了一种创建对象的最佳方式。
这种模式是实现了一个原型接口,该接口用于创建当前对象的克隆。当直接创建对象的代价比较大时,则采用这种模式。例如,一个对象需要在一个高代价的数据库操作之后被创建。我们可以缓存该对象,在下一个请求时返回它的克隆,在需要的时候更新数据库,以此来减少数据库调用。
克隆羊问题
现在有一只?tom,姓名为tom,年龄为:1,颜色为:白色,请编写程序创建和tom羊属性完全相同的十只羊。
传统方式我们会先new Sheep(“tom”, 1, “白色”); 然后for 循环生成10只羊
Sheep sheep = new Sheep("tom", 1, "白色");
for (int i = 0; i < 9; i++) {
    new Sheep(sheep.getName(), sheep.getAge(), sheep.getColor());
}
这样虽然容易理解好操作,但缺点是每次创建新的对象,总是需要重新获取原始对象的属性 ,如果创建的对象比较复杂时,效率较低。总是需要重新初始化对象,而不是动态的获得对象运行时的状态,不够灵活
改进思路
Java 的Object类提供了一个clone方法,该方法可以将一个Java对象复制一份,实现 Cloneable 接口
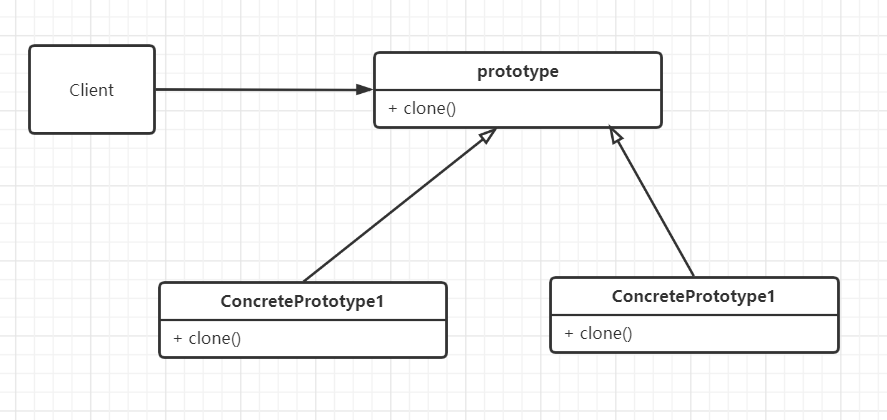
原理结构图说明:
- Prototype:原型类,声明一个自己克隆的接口
- ConcretePrototype:具体的原型类,实现一个克隆自己的操作
- Client:让一个原型对象克隆自己,从而创建一个新的对象
public class Sheep implements Cloneable{
    private String name;
    private int age;
    private String color;

    public Sheep(String name, int age, String color) {
        this.name = name;
        this.age = age;
        this.color = color;
    }

    public String getName() {
        return name;
    }

    public void setName(String name) {
        this.name = name;
    }

    public int getAge() {
        return age;
    }

    public void setAge(int age) {
        this.age = age;
    }

    public String getColor() {
        return color;
    }

    public void setColor(String cloud) {
        this.color = cloud;
    }

    @Override
    public Sheep clone() {
        try {
            return (Sheep) super.clone();
        } catch (CloneNotSupportedException e) {
            throw new AssertionError();
        }
    }
}
public class Client {
public static void main(String[] args) {
Sheep sheep = new Sheep("tom", 1, "白色");
Sheep sheep1 = sheep.clone();
Sheep sheep2 = sheep.clone();
Sheep sheep3 = sheep.clone();
Sheep sheep4 = sheep.clone();
Sheep sheep5 = sheep.clone();
}
}原型模式在spring源码的使用
Spring中原型bean的创建,就是原型模式的应用
beans.xml
<bean id="id01" class="com.ljs.spring.bean.Monster" scope="prototype"></bean>Test.java
ApplicationContext applicationContext = new ClassPathXmlApplicationContext("beans.xml");
Object bean = applicationContext.getBean("id01");
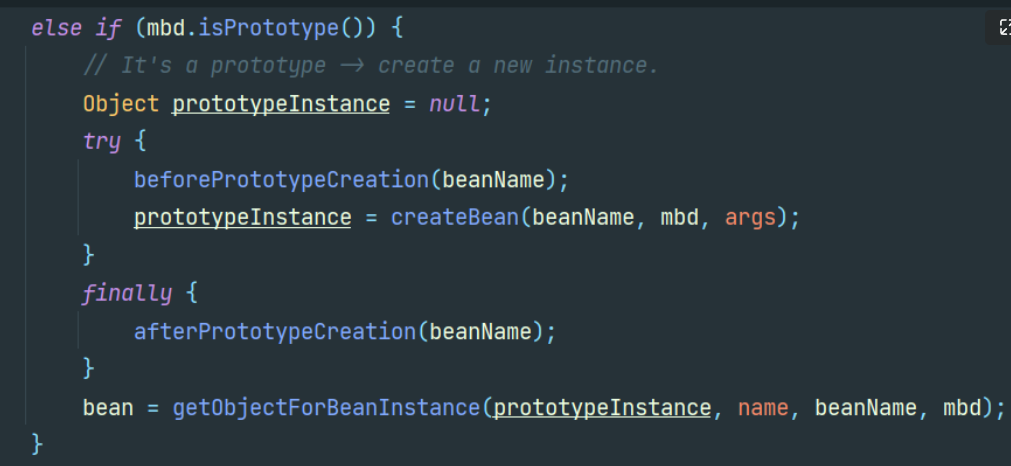
System.out.println("bean"+bean)Spring 框架中,创建ApplicationContext时,使用的getBean方法中使用到了原型模式
浅拷贝和深拷贝
浅拷贝基本介绍
1)对于数据类型是基本数据类型的成员变量,浅拷贝会直接进行值传递,也就是将该属性值复制一份给新的对象
2)对于数据类型是引用数据类型的成员变量,比如说成员变量是某个数组、某个类的对象等,那么浅拷贝会进行引用传递,也就是只是将该成员变量的引用值(内存地址)复制一份给新的对象。因为实际上两个对象的该成员变量都指向同一个实例。在这种情况下,在一个对象中修改该成员变量会影响到另一个对象的该成员变量值
3)前面我们克隆羊就是浅拷贝
4)浅拷贝是使用默认的 clone 方法来实现:
sheep=(Sheep)super.clone();
深拷贝基本介绍
1)复制对象的所有基本数据类型的成员变量值
2)为所有引用数据类型的成员变量申请存储空间,并复制每个引用数据类型成员变量所引用的对象,直到该对象可达的所有对象。也就是说,对象进行深拷贝要对整个对象进行拷贝
3)深拷贝实现方式 1:重写 clone 方法来实现深拷贝
4)深拷贝实现方式 2:通过对象序列化实现深拷贝
深拷贝方式 1
public class DeepClonableTarget implements Serializable, Cloneable {

    private String cloneName;
    private String cloneClass;

    public DeepClonableTarget(String cloneName, String cloneClass) {
        this.cloneName = cloneName;
        this.cloneClass = cloneClass;
    }

    public String getCloneName() {
        return cloneName;
    }

    public void setCloneName(String cloneName) {
        this.cloneName = cloneName;
    }

    public String getCloneClass() {
        return cloneClass;
    }

    public void setCloneClass(String cloneClass) {
        this.cloneClass = cloneClass;
    }

    @Override
    protected Object clone() throws CloneNotSupportedException {
        return super.clone();
    }
}

public class DeepPrototype implements Serializable, Cloneable {
    private String name;
    private DeepClonableTarget deepClonableTarget;

    public DeepPrototype() {
    }

    public String getName() {
        return name;
    }

    public void setName(String name) {
        this.name = name;
    }

    public DeepClonableTarget getDeepClonableTarget() {
        return deepClonableTarget;
    }

    public void setDeepClonableTarget(DeepClonableTarget deepClonableTarget) {
        this.deepClonableTarget = deepClonableTarget;
    }

    @Override
    protected Object clone() throws CloneNotSupportedException {
        //基本数据类型拷贝
        Object object = super.clone();
        //引用类型拷贝
        DeepPrototype deepPrototype = (DeepPrototype) object;
        deepPrototype.deepClonableTarget = (DeepClonableTarget) deepClonableTarget.clone();
        return object;
    }
}

public class DeepTest {
    public static void main(String[] args) throws CloneNotSupportedException {
        DeepPrototype prototype = new DeepPrototype();
        prototype.setName("宋江");
        prototype.setDeepClonableTarget(new DeepClonableTarget("及时雨", "及时雨的类"));

        DeepPrototype clone1 = (DeepPrototype) prototype.clone();
        DeepPrototype clone2 = (DeepPrototype) prototype.clone();
        DeepPrototype clone3 = (DeepPrototype) prototype.clone();
        DeepPrototype clone4 = (DeepPrototype) prototype.clone();
        DeepPrototype clone5 = (DeepPrototype) prototype.clone();

        System.out.println(prototype.getName() + ", " + prototype.getDeepClonableTarget().hashCode()); // 宋江, 1554874502
        System.out.println(clone1.getName() + ", " + clone1.getDeepClonableTarget().hashCode()); // 宋江, 1846274136
        System.out.println(clone2.getName() + ", " + clone2.getDeepClonableTarget().hashCode()); // 宋江, 1639705018
        System.out.println(clone3.getName() + ", " + clone3.getDeepClonableTarget().hashCode()); // 宋江, 1627674070
        System.out.println(clone4.getName() + ", " + clone4.getDeepClonableTarget().hashCode()); // 宋江, 1360875712
        System.out.println(clone5.getName() + ", " + clone5.getDeepClonableTarget().hashCode()); // 宋江, 1625635731
    }
}
深拷贝方式 2
public class DeepClonableTarget implements Serializable, Cloneable {
    private String cloneName;
    private String cloneClass;

    public DeepClonableTarget(String cloneName, String cloneClass) {
        this.cloneName = cloneName;
        this.cloneClass = cloneClass;
    }

    public String getCloneName() {
        return cloneName;
    }

    public void setCloneName(String cloneName) {
        this.cloneName = cloneName;
    }

    public String getCloneClass() {
        return cloneClass;
    }

    public void setCloneClass(String cloneClass) {
        this.cloneClass = cloneClass;
    }
}

public class DeepPrototype implements Serializable, Cloneable {
    private String name;
    private DeepClonableTarget deepClonableTarget;

    public DeepPrototype() {
    }

    public String getName() {
        return name;
    }

    public void setName(String name) {
        this.name = name;
    }

    public DeepClonableTarget getDeepClonableTarget() {
        return deepClonableTarget;
    }

    public void setDeepClonableTarget(DeepClonableTarget deepClonableTarget) {
        this.deepClonableTarget = deepClonableTarget;
    }

    public DeepPrototype deepClone() {
        ByteArrayOutputStream bos = null;
        ObjectOutputStream oos = null;
        ByteArrayInputStream bis = null;
        ObjectInputStream ois = null;
        try {
            // 序列化
            bos = new ByteArrayOutputStream();
            oos = new ObjectOutputStream(bos);
            oos.writeObject(this);
            // 反序列化
            bis = new ByteArrayInputStream(bos.toByteArray());
            ois = new ObjectInputStream(bis);
            return (DeepPrototype) ois.readObject();
        } catch (Exception e) {
            e.printStackTrace();
            return null;
        } finally {
            try {
                if (ois != null) {
                    ois.close();
                }
                if (bis != null) {
                    bis.close();
                }
                if (oos != null) {
                    oos.close();
                }
                if (bos != null) {
                    bos.close();
                }
            } catch (IOException e) {
                e.printStackTrace();
            }
        }
    }
}

public class DeepTest {
    public static void main(String[] args) throws CloneNotSupportedException {
        DeepPrototype prototype = new DeepPrototype();
        prototype.setName("宋江");
        prototype.setDeepClonableTarget(new DeepClonableTarget("及时雨", "及时雨的类"));

        DeepPrototype clone1 = prototype.deepClone();
        DeepPrototype clone2 = prototype.deepClone();
        DeepPrototype clone3 = prototype.deepClone();
        DeepPrototype clone4 = prototype.deepClone();
        DeepPrototype clone5 = prototype.deepClone();

        System.out.println(prototype.getName() + ", " + prototype.getDeepClonableTarget().hashCode()); // 宋江, 644117698
        System.out.println(clone1.getName() + ", " + clone1.getDeepClonableTarget().hashCode()); // 宋江, 317574433
        System.out.println(clone2.getName() + ", " + clone2.getDeepClonableTarget().hashCode()); // 宋江, 885284298
        System.out.println(clone3.getName() + ", " + clone3.getDeepClonableTarget().hashCode()); // 宋江, 1389133897
        System.out.println(clone4.getName() + ", " + clone4.getDeepClonableTarget().hashCode()); // 宋江, 1534030866
        System.out.println(clone5.getName() + ", " + clone5.getDeepClonableTarget().hashCode()); // 宋江, 664223387
    }
}
方式 1 和方式 2 对比
在对象引用类型的成员属性较少时,方式 1 简单;在对象引用类型的成员属性较多时,方式 2 简单
在对象引用类型的成员属性经常发生变化时,方式 1 需要同步修改,方式 2 不用修改
推荐使用方式 2:耦合性低、可维护性强、扩展性高
注意事项和细节
1)优点:创建新的对象比较复杂时,可以利用原型模式简化对象的创建过程,同时也能够提高效率
2)优点:不用重新初始化对象,而是动态地获得对象运行时的状态
3)优点:如果原始对象发生变化(增加或者减少属性),其它克隆对象的也会发生相应的变化,无需修改代码
4)缺点:在实现深克隆的时候可能需要比较复杂的代码
5)缺点:需要为每一个类配备一个克隆方法,这对全新的类来说不是很难,但对已有的类进行改造时,需要修改其源代码,违背了OCP 原则,这点请同学们注意